

Googling Exasol
As we mentioned in an earlier blog article, we offer the Cloud Wizard for our analytics database — so you can set up your Exasol cluster in a matter of clicks on cloud platforms. This solution and our ready-to-use machine images were announced as part of our official support of the Google Cloud platform. With the addition of the Big Query SQL dialect to our Virtual Schemas, we now can also provide you with integration into one of Google’s popular SaaS services. Other services are on our roadmap and will follow suit.
Using Big Query as data source for Exasol
Regular tech blog readers will notice that the use case I am going to cover today is the same one I referenced in a recent article about connecting Exasol to AWS Athena.
This is what we are going to do:
- Set up a project on Google Cloud.
- Download a fun dataset from the public domain. That’s right, it’s UFO chasing time again!
- Upload the dataset to a bucket in Google Cloud Storage.
- Create the credentials necessary to connect to Big Query.
- Setup Exasol with a Virtual Schema for Big Query.
- Run a query through the Virtual Schema.
The Project is everything
Before you start following this tutorial, you first need a project in Google Cloud, as context for your setup. Unless you set up your very own Google Could account, projects will be under the control of your IT department — or with the administrator of your organization’s Google account.
If you happen to have administrative privileges, take a look at Creating and Managing Projects in the Google Cloud Guides section. If not, ask your admin to create a project for you.
UFO hunting – the second wave of little green people
When I was looking for a public domain data set for an earlier article, I came across one about UFO sightings and chose it for my tutorials for two reasons: firstly because it is entertaining, secondly because the data set displays some of the typical data quality challenges everyone working in analytics has to face on a regular basis – like missing values or values that don’t match the data type of the column.
Please download the UFO sightings data set provided by the ‘NUFORC’ as a preparation.
Saucers in a bucket
Next, log into the Google Cloud Console and create a bucket for storing the data set.
If you’re new to the Google cloud, here is a short walk through for you:
- In the menu on the left section ‘Storage’ click ‘Storage’ → ‘Browser’.
- Click the ‘Create Bucket’ link.
- Give the bucket a name and write it down so that you remember it.
- For our example a regional bucket with bucket-level permission is sufficient, so choose those options.
- Click ‘Create’.
- Click the name of the newly created bucket in the list.
- Click ‘Upload files’.
- Pick the UFO data set and upload it.
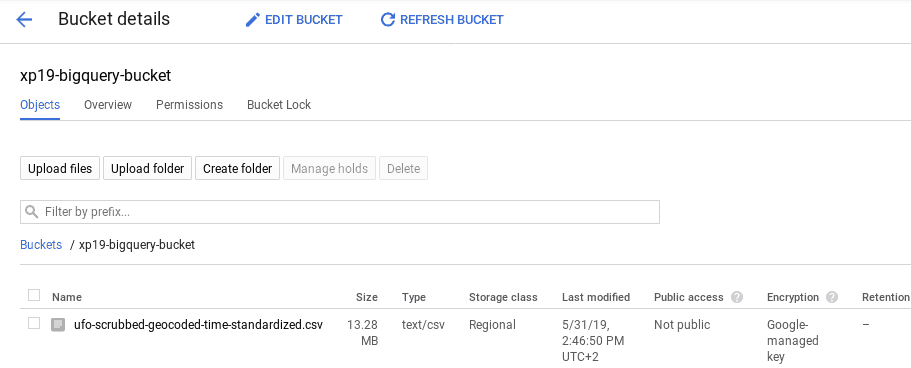
At this point your bucket content should look like this:
Preparing Big Query
As a next step we’ll set up Big Query.
- Open the navigation menu on the left, and under ‘Loading...Big Data’ click ‘BigQuery‘
- (you have to scroll down the list quite a lot).
- In the BigQuery console you’ll see a list of resources on the left hand side.
- Select the name of the project created earlier.
- Click ‘CREATE DATASET’ on the right.
- In dialog ‘Create dataset’ by: Entering a dataset ID (in our example it’s ‘xp19ufos’).
- Choosing the data location – make sure it’s in the same region as the bucket created earlier.
- Choose ‘Never’ as the expiration date.
- Select the newly created dataset (below the project in the resource list on the left)
- Click ‘CREATE TABLE’.
- In dialog ‘Create table’ by:
- Selecting ‘Create table from’ : ‘Google Cloud Storage’.
- Browsing to the UFO dataset inside the bucket we created earlier.
- Choosing ‘CSV’ as the ‘File format’.
- Naming the table ‘ufos’.
- Choosing ‘No partitioning’.
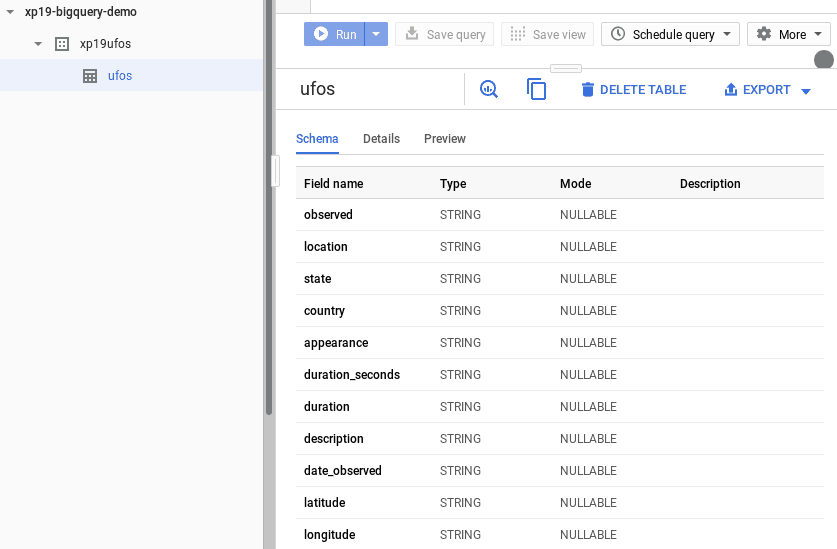
- Adding the following type of fields for ‘STRING’: ‘observed’, ‘location’, ‘state’, ‘country’, ‘appearance’, ‘duration_seconds’, ‘duration’, ‘description’, ‘date_observed’, ‘latitude’ and ‘longitude’.
- Making sure all fields are nullable.
After these steps, Big Query knows the schema of you test dataset and where to find the raw data. Here is what your setup should look like:
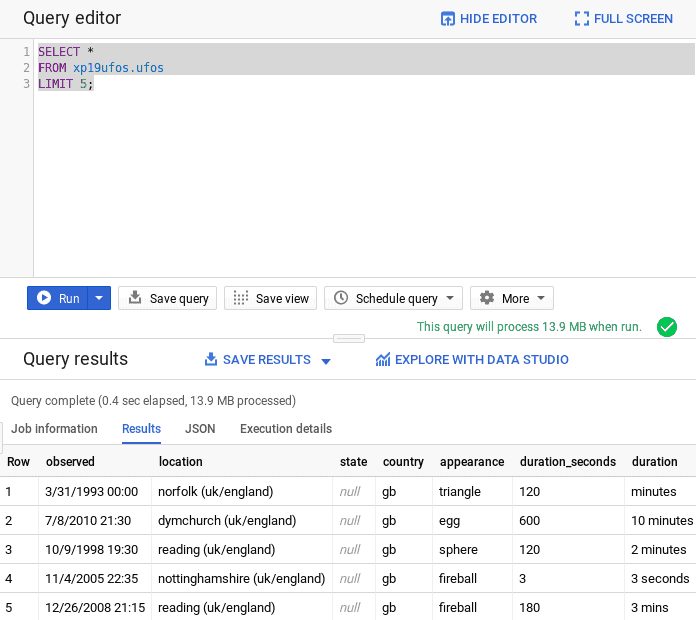
As a simple validation run the following query in Big Query’s ‘Query editor’:
SELECT * FROM xp19ufos.ufos LIMIT 5;
The result will look like this:
Now that you know that Big Query is setup correctly, you can take the next step and get prepared to attach an Exasol Virtual Schema.
What’s the code word?
In order to access Big Query through a Virtual Schema, you need to authenticate against Big Query. For that you need to create a so called ‘service account’ and its credentials. Basically, this is a machine user account that accesses a Google service with a set of permissions assigned to it by an administrator.
To create a service account, follow these steps:
- Open the API & Services Dashboard by bringing up the menu and clicking ‘APIs & Services’ → ‘Dashboard’
- Click ‘Credentials’.
- Click ‘Create credentials’ (choose ‘Service Account Credentials’).
- In wizard ‘Create service account’ by:
- Entering a new service account name.
- Selecting ‘JSON’ as the key type.
- Selecting roles: ‘BigQuery Data Viewer’, ‘BigQuery Job User’ and ‘BigQueryMetadata Viewer’.
- Click ‘Create’. This automatically causes your browser to download the private key.
You will need the email address that identifies the service account as well as the downloaded private key later for connecting the Virtual Schema to Big Query.
Setting up everything in our Loading...analytics database
What you need here are the following things:
- A running Exasol cluster or single-host installation.
- The latest Virtual Schema JAR file.
- A JDBC driver for Big Query (pick the one that supports JDBC standard 4.2).
Installing our analytics database
Before can configure the Virtual Schema, you obviously need a running Exasol analytics database to install it on. You have three different options for this tutorial:
1. Reusing an existing Exasol analytics database installation
If you already installed a working database, you can skip this step. If not, you have two quick options.
2. Deploying Exasol on the Google Cloud using the Cloud Deployment Wizard
In case you want the full Google experience, I recommend starting up our Cloud Deployment Wizard and setting up a cluster on Google. Since that is a topic on its own and would make this tutorial too long, please refer to ‘Exasol on Google Cloud’ for more information.
As this is a tutorial we’re going to optimize our setup for the minimum possible costs by creating a single-node Exasol installation with the smallest possible instance type.
- Start the Cloud Deployment Wizard.
- Select ‘Google Cloud’.
- Select the region where you set up the bucket and Big Query.
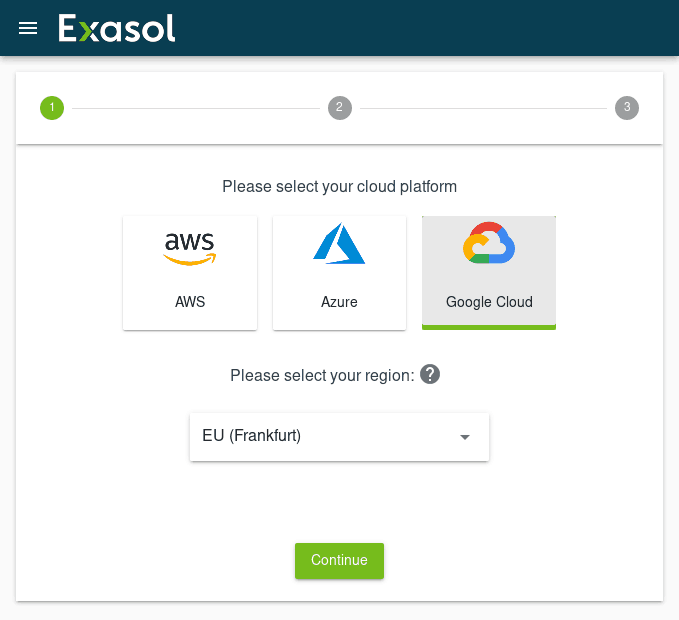
- Cloud Deployment Wizzard for Google
- Click ‘Continue’.
- Click the ‘Advanced Configuration’ button.
- Select ‘Exasol Single Node’.
- Select the ‘Instance Family’ and ‘General Purpose’.
- Select the smallest instance type and model.
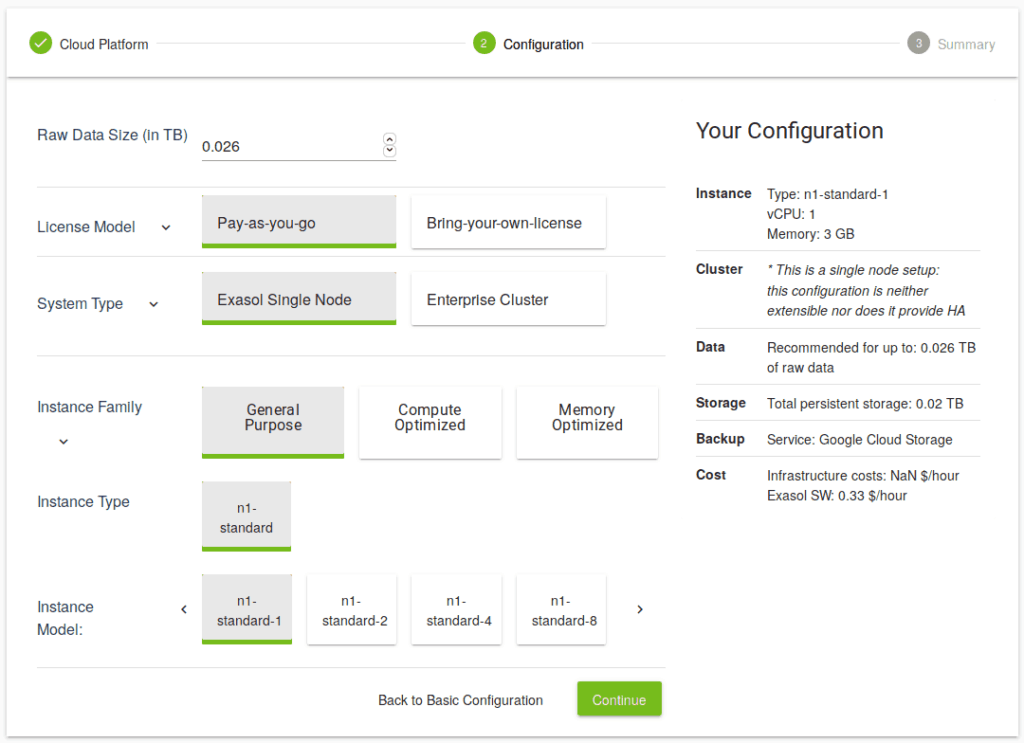
- Click ‘Continue’.
- Check the displayed summary.
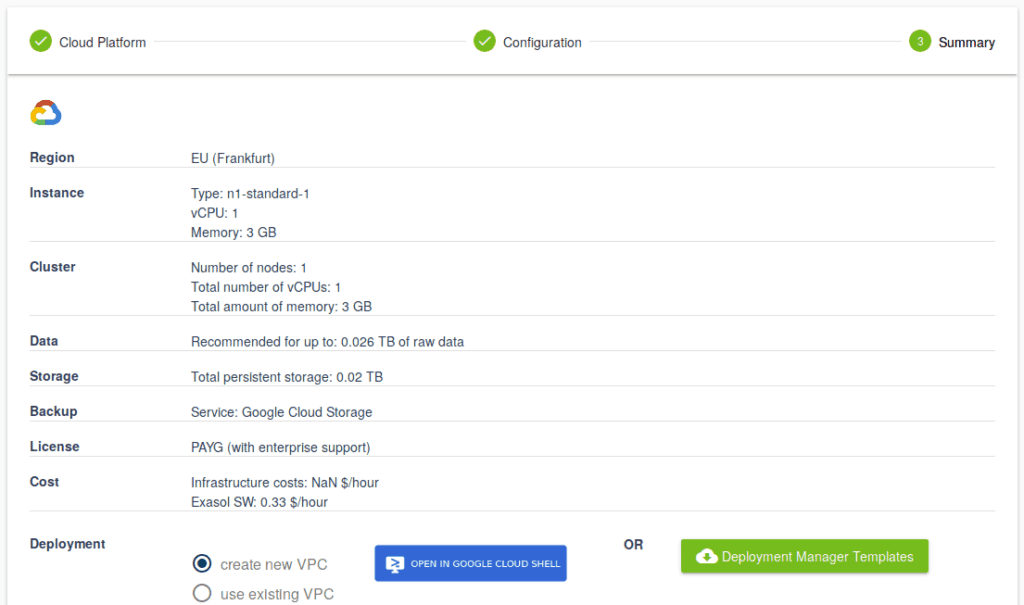
- Click ‘create new VPC’.
- Choose one of the two deployment options: either directly via Google Cloud Shell or by downloading the Deployment Manager templates and executing them separately.
3. Running our Community Edition of the database
Your third option is to download the community edition of Exasol’s analytics database and install it on your local machine. The community edition is a size-limited, single-node setup of our analytics database. It’s perfectly fine for the purpose of this tutorial and comes at no extra cost.
Installing the Virtual Schema
No matter which installation option you picked, setting up the Virtual Schema is always the same. Just make sure that your Exasol analytics database is able to access the Big Query service. Check network and firewall settings in case the connection cannot be established.
Follow the steps described in the documentation of the BigQuery SQL dialect for Virtual Schemas to setup the Virtual Schema.
We regularly improve this documentation to make it more user-friendly, so I am deliberately not copying the instructions into this blog article.
Googling little green people through the Virtual Schema
Once you have the Virtual Schema setup ready, you can now access the UFO dataset through Big Query as if it were just a regular table — or rather a view — inside of Exasol.
The following query creates a ‘top five’ of UFO sightings, grouped by appearance. Sadly we can’t help you create an interstellar space ship. Well, at least not yet.
SELECT COUNT(1) AS "spot_count", "appearance"
FROM BIGQUERYTEST."ufos"
GROUP BY "appearance"
ORDER BY "spot_count"
LIMIT 5;
In the example BIGQUERYTEST is the name of the Virtual Schema and ufos the name of the virtual table, the CSV data is projected on.
Exasol’s native Google Could experience
As you saw, we now natively support the Google Cloud platform with Exasol’s Cloud Deployment Wizard, Big Query Virtual Schema and ready-to-use machine images.
Keep an eye on our roadmap to learn what’s up next on the Google platform.